Mostly about stamping, but also upcycling, sewing, crocheting scrapbooking, jewelrymaking and everything in between. Check out my youtube channel at: https://www.youtube.com/channel/UCdJ2kY0OVsAl3xY93T4TaZg
Thursday, 29 April 2010
Sweetpea anniversary celebration
Meet us for some small chit chat, celebrating our one year anniversay at SNR on Wednesday, April 28th at 10:00 PM Eastern time zone. Ask the design team questions, see some sneak peek designs and have a chance in some drawings for free stamps! See you there!
(I might not be there as it will be at least 4 am here, but I hope you'll have fun)
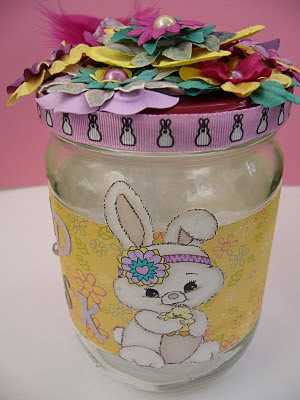
Pixie cottage easter jar.
A little bit late - or waaaay too early for easter gifts, but when I found out the theme of the week was "flower bonanza" at the pixie cottage I just had to go with these cute bunnies. All I know was I wanted to use them and some of my huge stash of flowers. I started feeling a bit guilty for buying so much and not using it so that was my starting point. I've been wanting to decorate a plain jar from jam or pickles or whatever it was it inhibited before :)
Here's the result. Seen from left to right. "Glad påsk" means "happy easter". Don't you just love that little bunny ribbon? I thoought of it while working on the flowers. Thought it was perfect. The little feathers was also one of the things laying around. Sometimes it pays off to work in a mess, lol. I got it years and years ago at a thriftstore and never used it until now. I'm so glad I'm using so much of my stash. Not only does it save me money, but it declutters so mcu and that's the best part!
Seen from above. I actually didn't notice until now that a flowerbundle is missing from the far right side. I found it on the floor when I went back inside (from photographing on the balcony) but didn't think about the fact that it was missing from the photos, lol.
Before I started I was wondering how to assemble the flowers as that is always the trickiest part I think. Here's how I solved it:
First I took bigger flowers and attached them with glue like this:
After that smaller ones in the spaces between. Attach them with 3D tape to make them stand up a bit.
Make the center flower by putting together 4-5 flowers in different sizes. Attach every one of them with 3D tape:
After that add different bling and pearls to the center of the flowers or do the budget one: add glitterglue/liquid pearls.
Add a ribbon around the lid's edge. I used glue because it allowed me to move the ribbon around a bit before drying, but you can use double sided tape if you prefer.
Cut a piece of patterned paper to fit the jar and attach with the same glue (that dries clear)
Embellish by adding text and coloured images and you have the prettiest gift in town. I'm planning to make a couple for my thriftstore and see if they sell. I'm sure they can get a little bit more than they would for that simple jar. This would be a great way to raise maney for your charity too.
We have a great sketch too on the blog so I hope you'll join us this week.
Monday, 26 April 2010
More candy
I've been so busy I haven't entered any blogcandies lately or updated my candylist for april. I'm sorry about that, I'll try to do better in may :) I still haven't sent out my candy that ended in march *blushing*, but I have put it together so now I just need to put addresses on them. Bare with me.
Meanwhile here is a candy from sweetpea. 5 stamps of your choice! Click the link to go straight to the post.
Sweetpea celebration sale
Sweetpea is one year today and to celebrate you can shop with a 10% discount on ALL stmps, even discounted ones! This is valid for today (sunday 25:th) ONLY.
You HAVE TO go through the link at the sweetpea blog. Just click the link and it will take you to the sweetpea's blog where you'll find the info and futher link to the shop.
Pearly necklace and earrings
A while back when I asked what you would like to see more on the blog most answers were: tutorials, jewelry and scrapbooking. I really took it to heart and I'm trying to make more tutorials. As for scrapbooking I treated myself with a colourprinter for my 30:th. When it comes to jewelry I've been quite busy too. So busy actually that I have a couple of things to show you and it's not just jewelry :) I'll prolong it though and post one project a day. I'm not so much on the net anymore as it takes all my time and energy. I try to be creative instead and now that it's such a wonderful weather I found myself knitting a while on the balcony today!
Anyhee. Here is a set I totally love. I usually wear silver, but this is one of the few gold-coloured items I have. I actually found the necklace pendant at a thrift store (love to shop at those!) It came with the pearls I think, but the necklace was broken. I added the little facetted golden pearls and the pearl clasp. Unfortunatelly it's not so easy finding good jewelry at those shops anymore. I think it has to do with the fact that it's become so trendy to shop at those stores and maybe even due to the econnomy. The only time I have a chance of finding something for what I want to pay is when it's broken and many places don't sell broken things.
When it comes to the earrings I got the beads at a sale (where else, lol) and they had the exact same nuance. It's actually a VERY easy construction, but the result is stunning, don't you agree? I'm working on a pair in purple/pink and silver at the moment. They do get a tiny bit heavy pulling at the earlobe holes which I think looks very unattractive so I'm thinking about fastening them to those stick earring thingies instead, you know those that go right through the hole, instead of the hook. (can't remember what they are called or maybe I don't even know?)
I meant to enter a contest with this set. The contest was to design a necklace and a pair of earrings for Victoria - the swedish crownprincess that is getting married this summer. Well, she wouldn't actually be wearing the winner's design - it was just the theme of the contest. Unfortunatelly I found the contest too late because it said in the rules that about 50% of the items had to come from the shop that organized it. I didn't have enough time to get my things, design something and send in my entry. So instead I designed a set with similar pearls I knew she had in her shop. I mean round pearly beads don't differ that much. So after I sent in my entry she contacted me saying she couldn't find me as one of her customers. I then explained my thought behind it that I did it due to lack of time and said I would be happy to order the similar beads from her shop (so I wouldn't miss the deadline) She answered quite "angryly" and said that it's not how it works and cited the rules to me. I thought it was a bit silly. I mean I understand the idea behind it. It should be fair to everyone, but at the same time she said no to a new customer that would spend at least $20-30. I was a bit perplexed because I thought the whole idea with the contest was to get people to buy more from her shop. I'm slightly annoyed and will take away the link to her shop from my blog. And I'll definately won't buy from her. She didn't have that much to start with anyway. I'm regretting sending it in and giving her the idea. Maybe it's a bit pety, but I can't help feeling this way.
Oh, if you're reading this far and you'd like to see a tutorial of the earrings just leave a comment and I'll see what I can do :)
Subscribe to:
Posts (Atom)